Do you need several pieces of software to make AI short dramas? Can special effects and editing be done on one platform?
Do you need several pieces of software to make AI short dramas? Can special effects and editing be done on one platform?
You don't necessarily have to use several pieces of software at the same time. I used Nadou Pro's Canvas to create a speculative “Rain Alley Neon” short shot: I connected a 2K establishing image with an instruction card, then generated an approximately 5-second silent video. The image and video were estimated at 3 and 7 credits respectively before submission, totaling an expected 10 credits. This practical test only verified that visual assets can be chained within the Canvas and did not put multiple shots or audio into the editing timeline. Using Nadou Pro's Canvas as an example, screenplay text, storyboards, character and scene references, video clips, voiceover and music, and basic editing can be linked within the same creative workflow. When a particular visual effect shot is needed, you can also first make the clip with the video generation or video editing feature, then connect it to the editing node and place it on the timeline with the narrative shots. Canvas Guide lists the purposes and connection methods of these nodes.
Whether you can "finish on one platform" depends on what the special effects are. Generating a segment that includes special lighting effects, weather, or scene changes is a different task from requiring multi-layer fine compositing, frame-by-frame repair, or delivery of specified post-production project files. The former can be prototyped and approved inside the Canvas; the latter requires judging, based on the final delivery requirements, whether professional post-production software is needed. You cannot assume that any effect can be generated to a deliverable simply because the feature list includes both "video" and "editing".
Which production stages can be kept in the same workflow
If you make an episode of a short drama from scratch, you can split the work into the following sections. The "checks" in the table are more important than "how many features were used": only if the result of the previous stage is usable can the next stage avoid rework.
Stage | How it can be done in the Canvas | What to check before moving to the next stage |
|---|---|---|
Script and storyboards | Write the plot and shot descriptions using text nodes, then break down shots with storyboard nodes | Whether each shot has clear characters, actions, and narrative purpose |
Characters and scenes | Create reference images in image nodes, save and reuse selected references | Whether character costumes, main props, and scene positions are clear |
Narrative and effect shots | Generate clips with video nodes; when footage already exists, you can input references or edit existing video according to the available mode | Whether action, character appearance, and effect start/end can connect to adjacent shots |
Sound | Prepare dialogue, narration, music, and ambient sound, and place corresponding clips as needed for the footage | Whether dialogue duration fits, and whether music will drown out the dialogue |
Editing and export | Attach videos, images, or audio to the editing node, click "Go to Edit" to assemble, preview and export | Whether the narrative is complete and whether the files play correctly |
Nadou Pro's official documentation explains the Canvas storyboard and editing nodes and the video generation and video editing modes, respectively. Different models and modes offer varying input methods, so start production based on the current interface.
"Same workflow" here means that assets can be continued between nodes in the Canvas. If you have already written the script in the script space, you can bring the finalized text into the Canvas to continue breaking down shots; the script space itself is not the same as a node in the Canvas.
How to connect effects and editing: make the hardest shot first
Assume a short narrative: the protagonist knocks over a cup of coffee, liquid splashes onto documents on the table; he sees the writing on the document change. This is an illustrative example of a production workflow and not based on a specific generation test. It involves hand movement, liquid motion, prop changes, and shot-to-shot continuity, so it's suitable to test before batch production.
First mark the start and end points of the effect in the storyboard. For example, shot one establishes the positions of the cup and the document, shot two shows the cup being knocked over, shot three shows a close-up of the changed document. Assign only the main actions to each shot, and write down the character positions, gaze, and prop states needed to connect to the next shot.
Then prepare reusable reference images. Select the protagonist's appearance, the desktop layout, the cup and the document, and save them by shot number. Reference images help specify features to retain but do not guarantee automatic consistency in generation; liquid, hands, and text especially must be checked per shot.
Generate the hardest shot first, then decide how to edit. You can first test the cup-tipping clip in the video node, check whether the action is readable, whether the document position is correct, and when the effect begins. If this shot is difficult to present stably, split the action into "cup tilting", "liquid falling", and "document changing" short segments, and use editing transitions to express the event rather than requiring one long shot to complete all changes. When usable footage already exists, check the video editing guide to see whether it is suitable to modify the original clip.
Finally assemble in the editing node. Attach the selected narrative shots, effect clips, and sounds to the editing node, click "Go to Edit", first do a rough cut in story order, then adjust the cup-clink sound, cut points, and the protagonist's reactions. Play through the full sequence before export: can viewers tell what happened? Are the liquid direction, document position, and character motions jumping unexpectedly? See the editing node operation guide for relevant entry points.
The key point of this path is to record shot numbers and usable versions during generation so they can be found during editing. If a shot is unsatisfactory, locate and modify that shot; if the problem actually lies in the storyboard or prop setup, go back upstream to adjust.
When one platform is enough and when external tools are needed
Decide based on the actual delivery requirements, not simply on whether it is an AI short drama.
-
You can prioritize testing on one platform: The goal is a short story, a small number of characters, relying on generated shots and basic editing; effect shots only need to allow the audience to understand the plot and visual continuity. After completing a sample, still check characters, props, dialogue, and sound.
-
You may need other post-production tools: If the client specifies project files or layered assets, requires precise tracking, complex compositing, frame-by-frame retouching, or demands imagery at a level the existing generation and editing features cannot reliably deliver, first identify which capability is lacking, then decide which step to outsource.
The Canvas Guide mentions that production results can be exported to DaVinci Resolve for further creation; the specific available export formats, asset scope, and project compatibility should be verified with a sample before taking an order — you should not promise that a certain project file can be losslessly transferred based solely on a document title.
So, before choosing tools, it may be worthwhile to make a small sample of "a narrative shot + one effect shot + one edit." If the script, assets, and final piece can be connected at the quality you need, there is no need to open separate software for each step; if you get stuck on a specific post-production requirement, then add a professional tool for that step.
Real Canvas case: make the rain alley lighting effect into a short shot that can be checked first
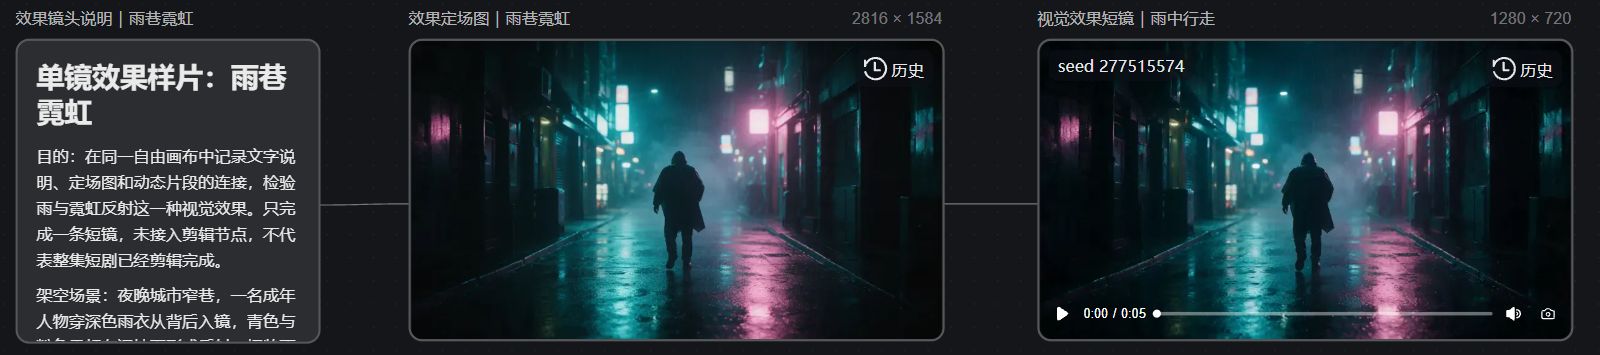
I created a Nadou Pro example Canvas, linking the effect description, establishing image, and video short shot together in production order. The scene is a fictional rainy night alley: an adult wearing a dark raincoat with their back to the camera, cyan and pink lights reflected on the wet ground. The "special effect" here specifically refers to the sense of rain and reflective atmosphere in the image, not layered compositing or frame-by-frame repair.
The establishing image generated by Seedream 5.0 Pro was 2816×1584. The image shows alley perspective, the figure's back, and two-color ground reflections; this image determined the composition and color tone to be carried into the short shot.
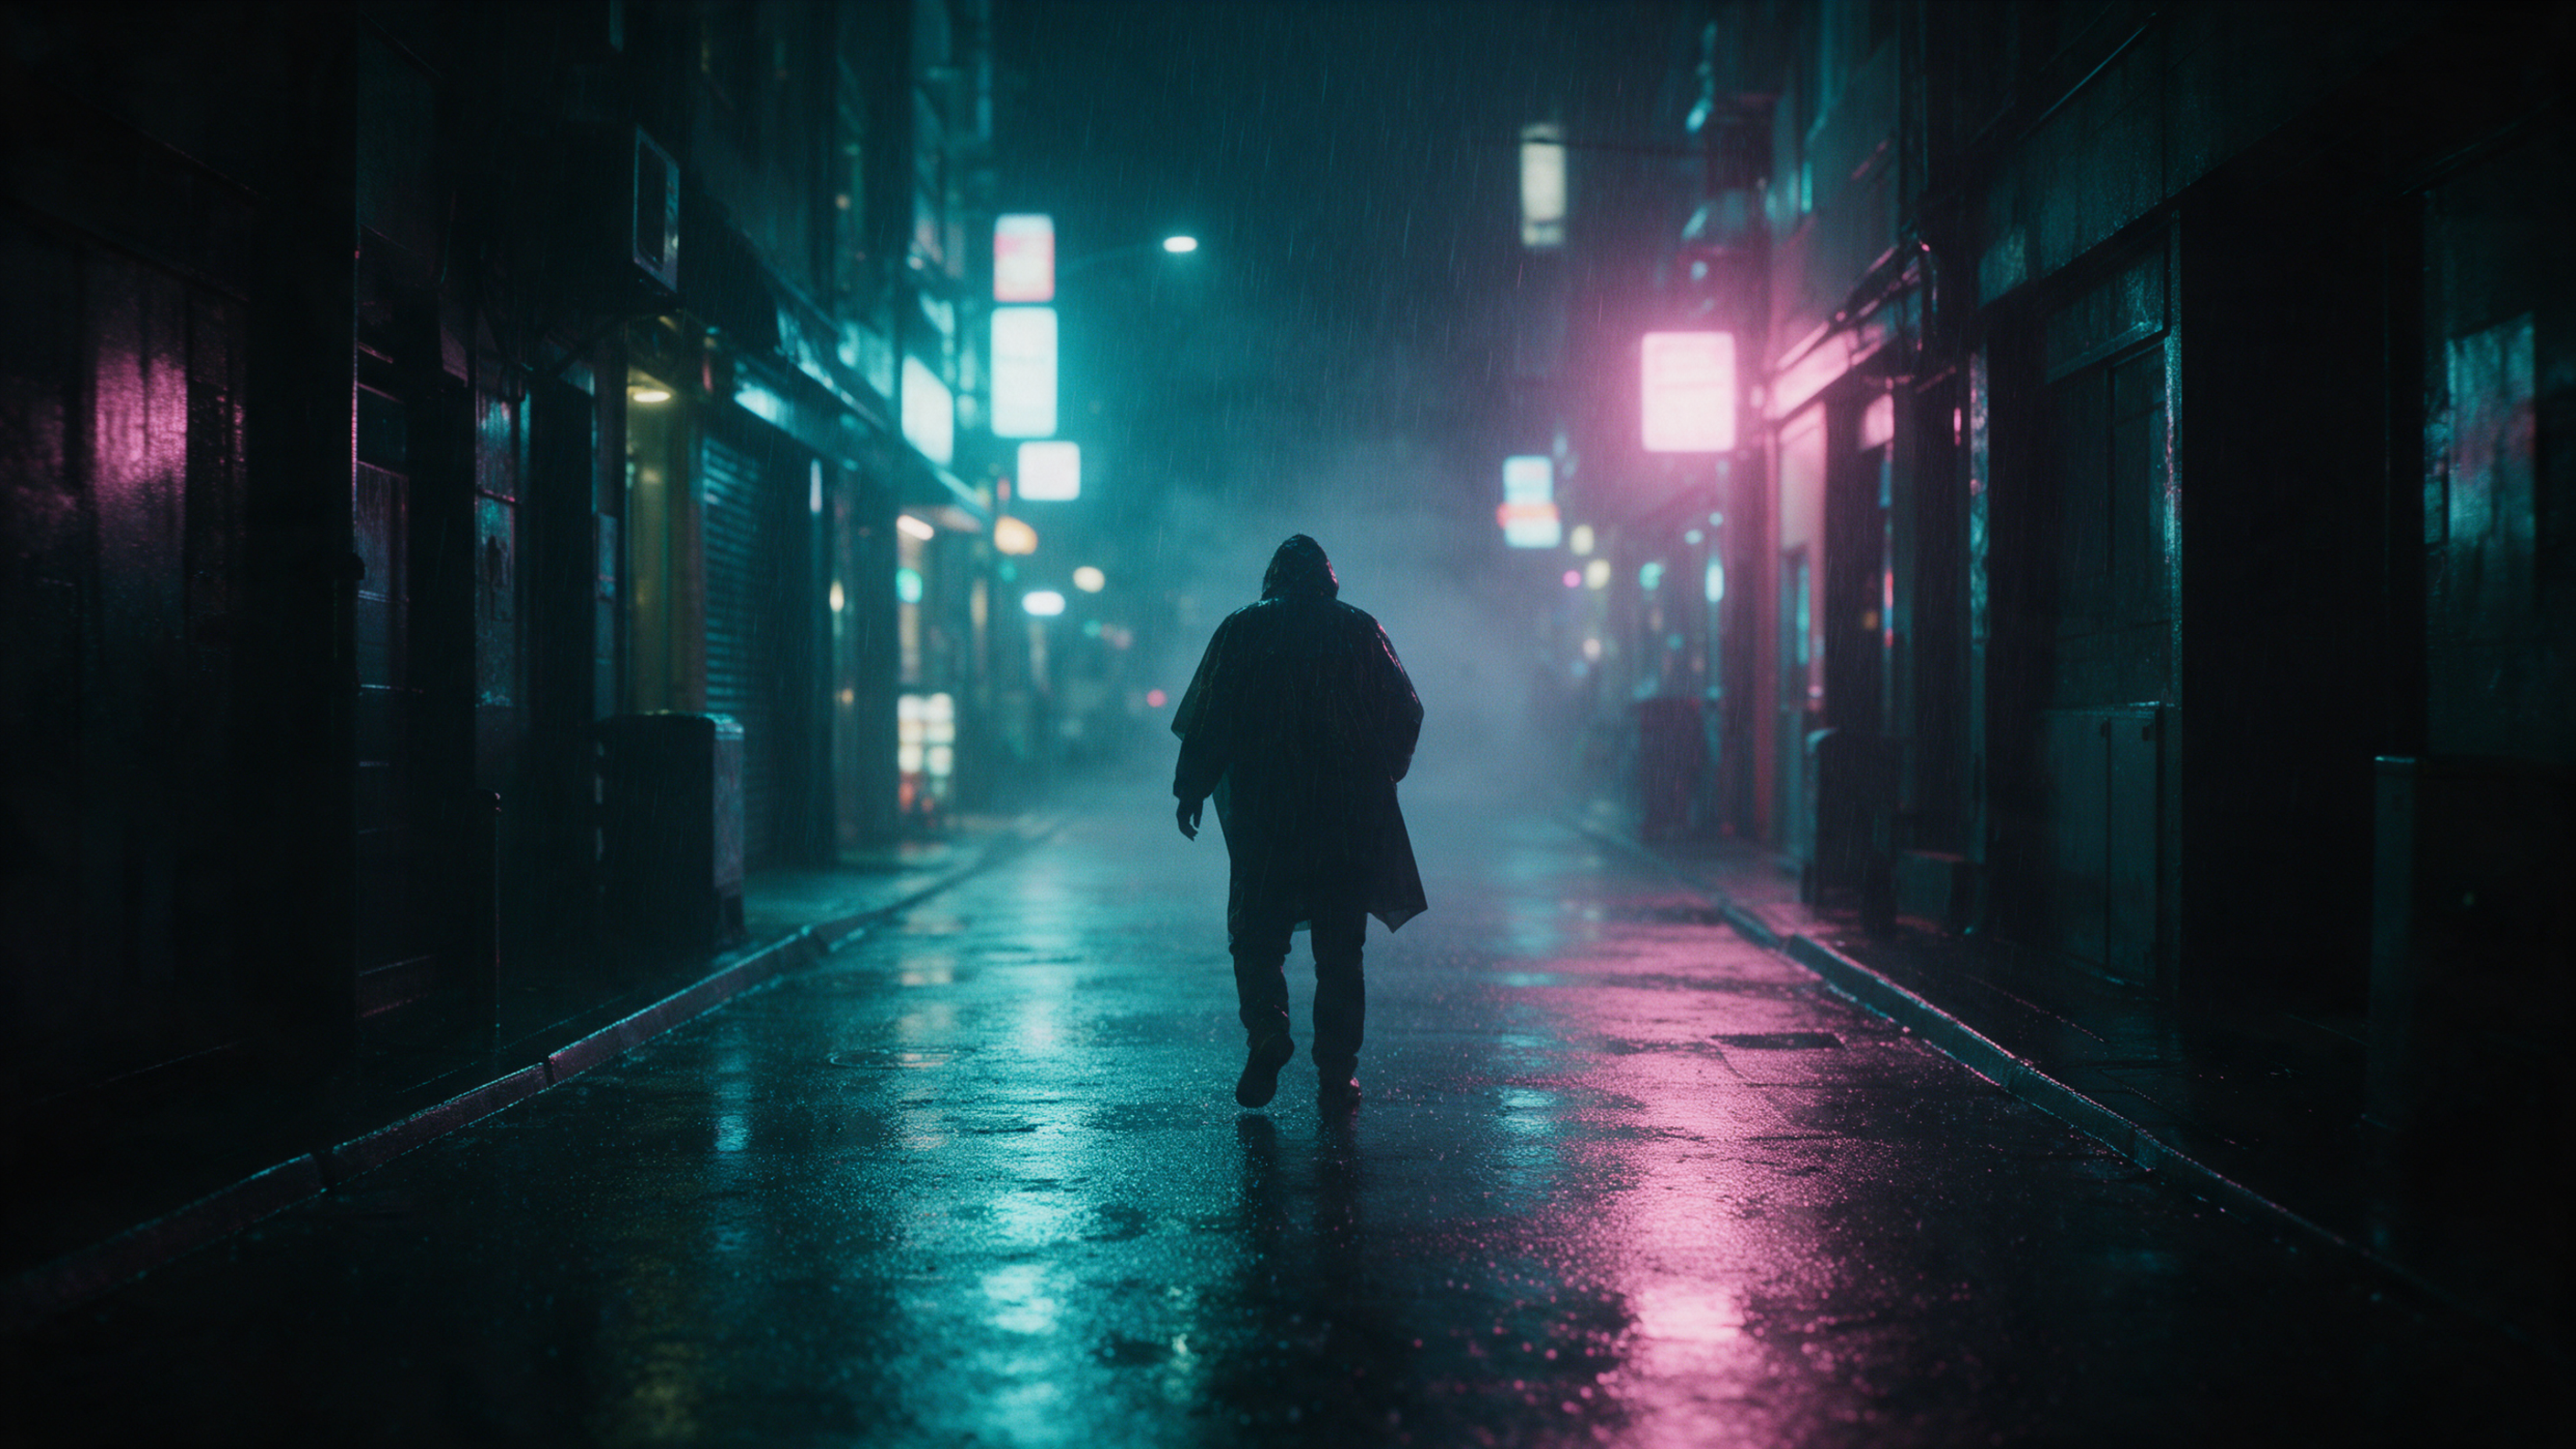
Using the establishing image as reference, Seedance 2.0 Mini generated a 1280×720, approximately 5-second, silent short shot. The shot's first frame continues the figure's back, alley perspective, and cyan-pink reflections, and can be used to check whether the atmosphere translates into video. To answer "can the short drama be completed on one platform", you would still need to add adjacent narrative shots and sound, enter the editing node to actually assemble and export; this case did not execute those steps.
The image below is a screenshot of the real Canvas web page for this case, allowing verification of the effect description, establishing image, video short shot, and node connections.