How to Make a Short Drama with AI: A Complete Step-by-Step Guide from Script to Final Cut
How to Make a Short Drama with AI: A Complete Step-by-Step Guide from Script to Final Cut
Creating a short drama with AI can proceed in this order: write a scene-by-scene script → break it into shots → prepare character and set references → generate video shot by shot → add voice and do a rough cut → adjust pacing and audio → export and check. Keep a reviewable result for each step and return to the corresponding stage to revise when problems are found.
For a first attempt, pick one protagonist and one main location, and complete a short story with a cause, conflict, and resolution. The following is a fictional exercise to illustrate the method: the protagonist packs to move, finds a recording left by their father, and finally makes a phone call. I tested one key shot of “discovering the old recording device” on the Nadou Pro canvas: a 2K establishing still followed by an approximately 5-second silent short shot, estimated at 3 and 7 credits respectively before submission, totaling an expected 10 credits. Other shots, the father’s recording, editing, and the full final cut are part of the lesson design and were not completed in this case.
The operational part uses Nadou Pro’s free canvas as an example. First determine which shots the story needs, then decide which nodes to use — you don’t have to enable every feature at the start.
Step 1: Write a Script That Can Be Filmed
Answer three questions first: what does the protagonist want to do, what obstacles do they encounter, and what choice do they make in the end. Then write the story as a scene-by-scene script, marking location, time, characters, actions, and dialogue for each scene.
For the moving example, “he suddenly understood his father” cannot be turned directly into an image. Break it into visible and audible changes: discovering a recording device while packing, hearing a familiar voice, putting down the clothes in hand, and picking up the phone to dial.
When asking AI to help write the script, you can request it like this:
Write a short drama set around moving house with only one on-screen protagonist and the main setting being a single room. The protagonist is preparing to leave and discovers a recording left by their father while sorting belongings, and ultimately decides to make a phone call. Please write by scene, listing character actions and dialogue or sounds separately; express emotional change through actions; do not add new characters or subplots.
This prompt is only a drafting example. After generating, read through: why is the recording there, why does the protagonist change their mind, and does the ending respond to the beginning. If the story logic is unclear, revise the script before producing visuals.
Deliverable for this stage: a finalized version of the scene-by-scene script. Also set the target duration and aspect ratio so subsequent production follows the same requirements.
Step 2: Break the Script into Shots and Estimate Dialogue Time
Each shot should describe one main action and include shot size, character positions, camera movement, and sound. Below is a simplified shot breakdown for the exercise; in actual production you can further split shots according to performance rhythm.
Shot | Visuals & Actions | Sound | What this shot needs to convey |
|---|---|---|---|
1 | Medium shot: the main character puts clothes into an open suitcase | Sounds of sorting items | Protagonist is preparing to leave |
2 | Close-up: the protagonist finds a recording device among old items | Handling noises, followed by a short pause | Introduces the story turning point |
3 | Close-up of the recording device as it begins to play | The father’s recording | Conveys the information that triggers the emotional change |
4 | Close-up on the protagonist’s face: motion freezes, gaze falls toward the suitcase | Recording continues | Shows the protagonist’s reaction to the audience |
5 | Medium shot: the protagonist puts down the clothes and picks up the phone to dial | Dial tone / waiting tone | Completes the ending through action |
For segments with dialogue, read them aloud or record a temporary voiceover to estimate delivery time, then assign shot durations. Otherwise you may end up with visuals ending before lines are finished.
In Nadou Pro you can create a new free canvas, add a script text node, paste the script, and click the "One-Click Split Shots" button. The automatic result requires manual review: did it miss a turning point, add unrelated shots, or misidentify characters and props? See the canvas interface guide at Canvas Guide.
Deliverable for this stage: a shot list with shot numbers, visuals, actions, sound, and estimated durations.
Step 3: Finalize Characters and Sets, Then Generate Motion Visuals
Choose character appearance, clothing, and the main set first. Use a consistent name for reference images of the same character and mark clothing states; also document the room layout, light direction, and key prop positions for the same scene.
For example, the protagonist wears a gray top in this scene, the suitcase sits beside the bed, and the recording device is in the cabinet. This information should accompany relevant shots rather than be rewritten for each generation. If the character changes clothes or the scene turns to night, save a corresponding state to avoid mixing references.
Nadou Pro’s image and video features allow reference materials to participate in generation; video also supports multi-reference modes. See the Multimedia Generation Guide for details. Reference images help preserve features you want to keep but do not replace verification. After generation, compare face shape, hairstyle, clothing, and props to confirm whether the shots can belong to the same story.
Deliverable for this stage: confirmed character reference images, set references, and necessary prop references. Do not bulk-generate videos for designs that are not yet finalized.
Step 4: Generate Video Shot by Shot, Validate the Hard Parts First
Pick one key shot from the shot list to test. For example, the shot where the protagonist discovers the recording device requires a clear prop position and interaction between person and object; validate this shot’s feasibility before deciding how to produce the others.
When choosing generation methods, judge based on available materials:
-
If you only have a textual concept, use text-to-video first to try out visuals and actions.
-
If you already have established visuals or subject references, choose a mode that accepts image input and focus your prompts on motion.
-
If you need to specify start and end visuals, try the first-and-last frame mode.
-
If the same character or set must recur, use multi-reference mode and verify results after each generation.
These modes are described in the Nadou Pro video feature documentation; actual options depend on the current node and model interface.
Describe actions as specifically as possible. For example: “Medium shot: the protagonist sits by the suitcase, looks down and sorts clothes; upon hearing the recording they stop their motion and the camera slowly pushes in.” If actions are excessive or results are unstable, split the shot to show sorting, pausing, and facial reaction separately.
After each generation, save usable versions by shot number. Check whether the character’s appearance has changed, whether hands and props behave oddly, and whether motion direction can connect to adjacent shots. If there are problems, identify the cause and then adjust reference images or action descriptions; do not change many conditions at once, or you will not know which change produced the effect.
Deliverable for this stage: organized video clips by shot number and a record of shots requiring rework.
Step 5: Prepare Audio and Produce a Comprehensible Rough Cut
Separate dialogue, narration, ambience, and music. In the exercise, the father’s recording carries plot information; first transcribe the lines clearly, then decide how music should enter.
Nadou Pro provides voiceover and music generation features. Prepare the required sounds following the Audio Features Guide. When using human voices, existing music, or other materials, verify the relevant usage permissions.
Connect materials to the editing node and click “Go to Edit” to assemble shots with temporary audio in story order. Refer to the editing node’s material input, online editing, and export flow at Editing Node Guide.
When doing a rough cut, judge three things first: can the opening establish the protagonist’s situation, is the turning point understandable, and does the ending hold up. Add missing reaction shots and trim repetitive shots that express the same information. Don’t rush to add transitions and effects at this stage.
Step 6: Adjust Pacing, Dialogue, and Shot Transitions
Once the story order is fixed, work segment by segment on pauses, performance, and sound. How long the protagonist’s reaction to the recording should last depends on the visuals; not every shot needs the same length.
Key checkpoints to inspect:
-
Between adjacent shots: do character positions, eyelines, and motions match; have props suddenly moved?
-
When dialogue appears: is the speaking rate appropriate; does music obscure the voice; when a character is on-screen and speaking, do lip movements match the lines?
-
At the turning point and ending: did you leave the audience time to understand and react; are you relying on explanatory voiceover to fill gaps?
If lip sync is off, first determine whether the audio is out of alignment or the generated visuals are unsuitable, then adjust the audio or redo the relevant shots. Do not assume any random video will naturally match any voiceover.
Check visuals and audio together when possible. Watching silently can reveal motion continuity issues; listening alone helps check dialogue and levels. Ultimately play the combined result to confirm they tell the story together.
Step 7: Export Files and Recheck Playback in Practice
Before exporting, verify project aspect ratio, duration, subtitles, and audio. Choose portrait or landscape based on the target distribution channel; resolution, frame rate, and file format should follow the channel’s current requirements and the tool’s available settings rather than a fixed preset.
After exporting, open the final file and check:
-
Whether the file plays normally, whether the start and end are complete, and whether there are black frames or missing shots.
-
Whether characters, sets, and subtitles are clear and whether subtitles contain typos or block important visuals.
-
Whether dialogue is intelligible and whether there are sudden loudness spikes, dropouts, or audio-video misalignment.
-
Whether the content and materials meet the target platform’s publishing, licensing, and AI content labeling requirements.
After the first version is complete, ask someone unfamiliar with the script to watch it and tell you what the protagonist wanted to do and why they changed their mind. Wherever the viewer cannot explain it, return to the corresponding script or shot. Finish telling one small story before adding characters, locations, or episodes.
Real Canvas Case: Validate the Shot “Discovering the Recording Device” First
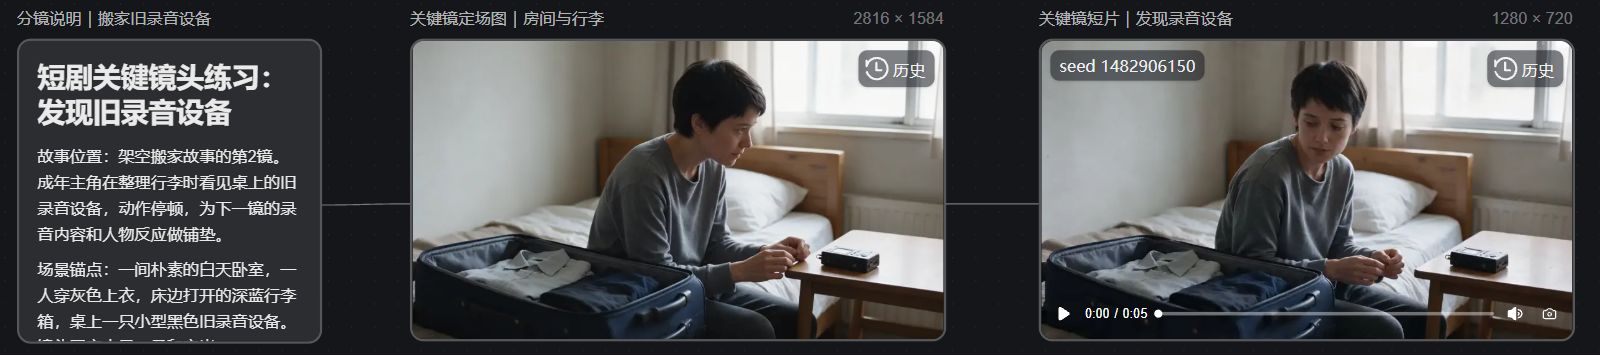
In the Nadou Pro example canvas, I connected the shot description, the establishing still, and the short shot sequentially. It corresponds to Shot 2 in the above shot list; the story and characters are fictional. Scene anchors are: a daytime bedroom, an adult protagonist wearing a gray top, a dark blue open suitcase by the bed, and a small black device on the table.
The 2816×1584 establishing still generated by Seedream 5.0 Pro shows the protagonist sitting on the bed with clear placement of clothes and the suitcase, and the small device on the table is also discernible. The device appearance can serve as a prop reference, but whether it matches the specific recorder model required by the script should be checked before formal production.
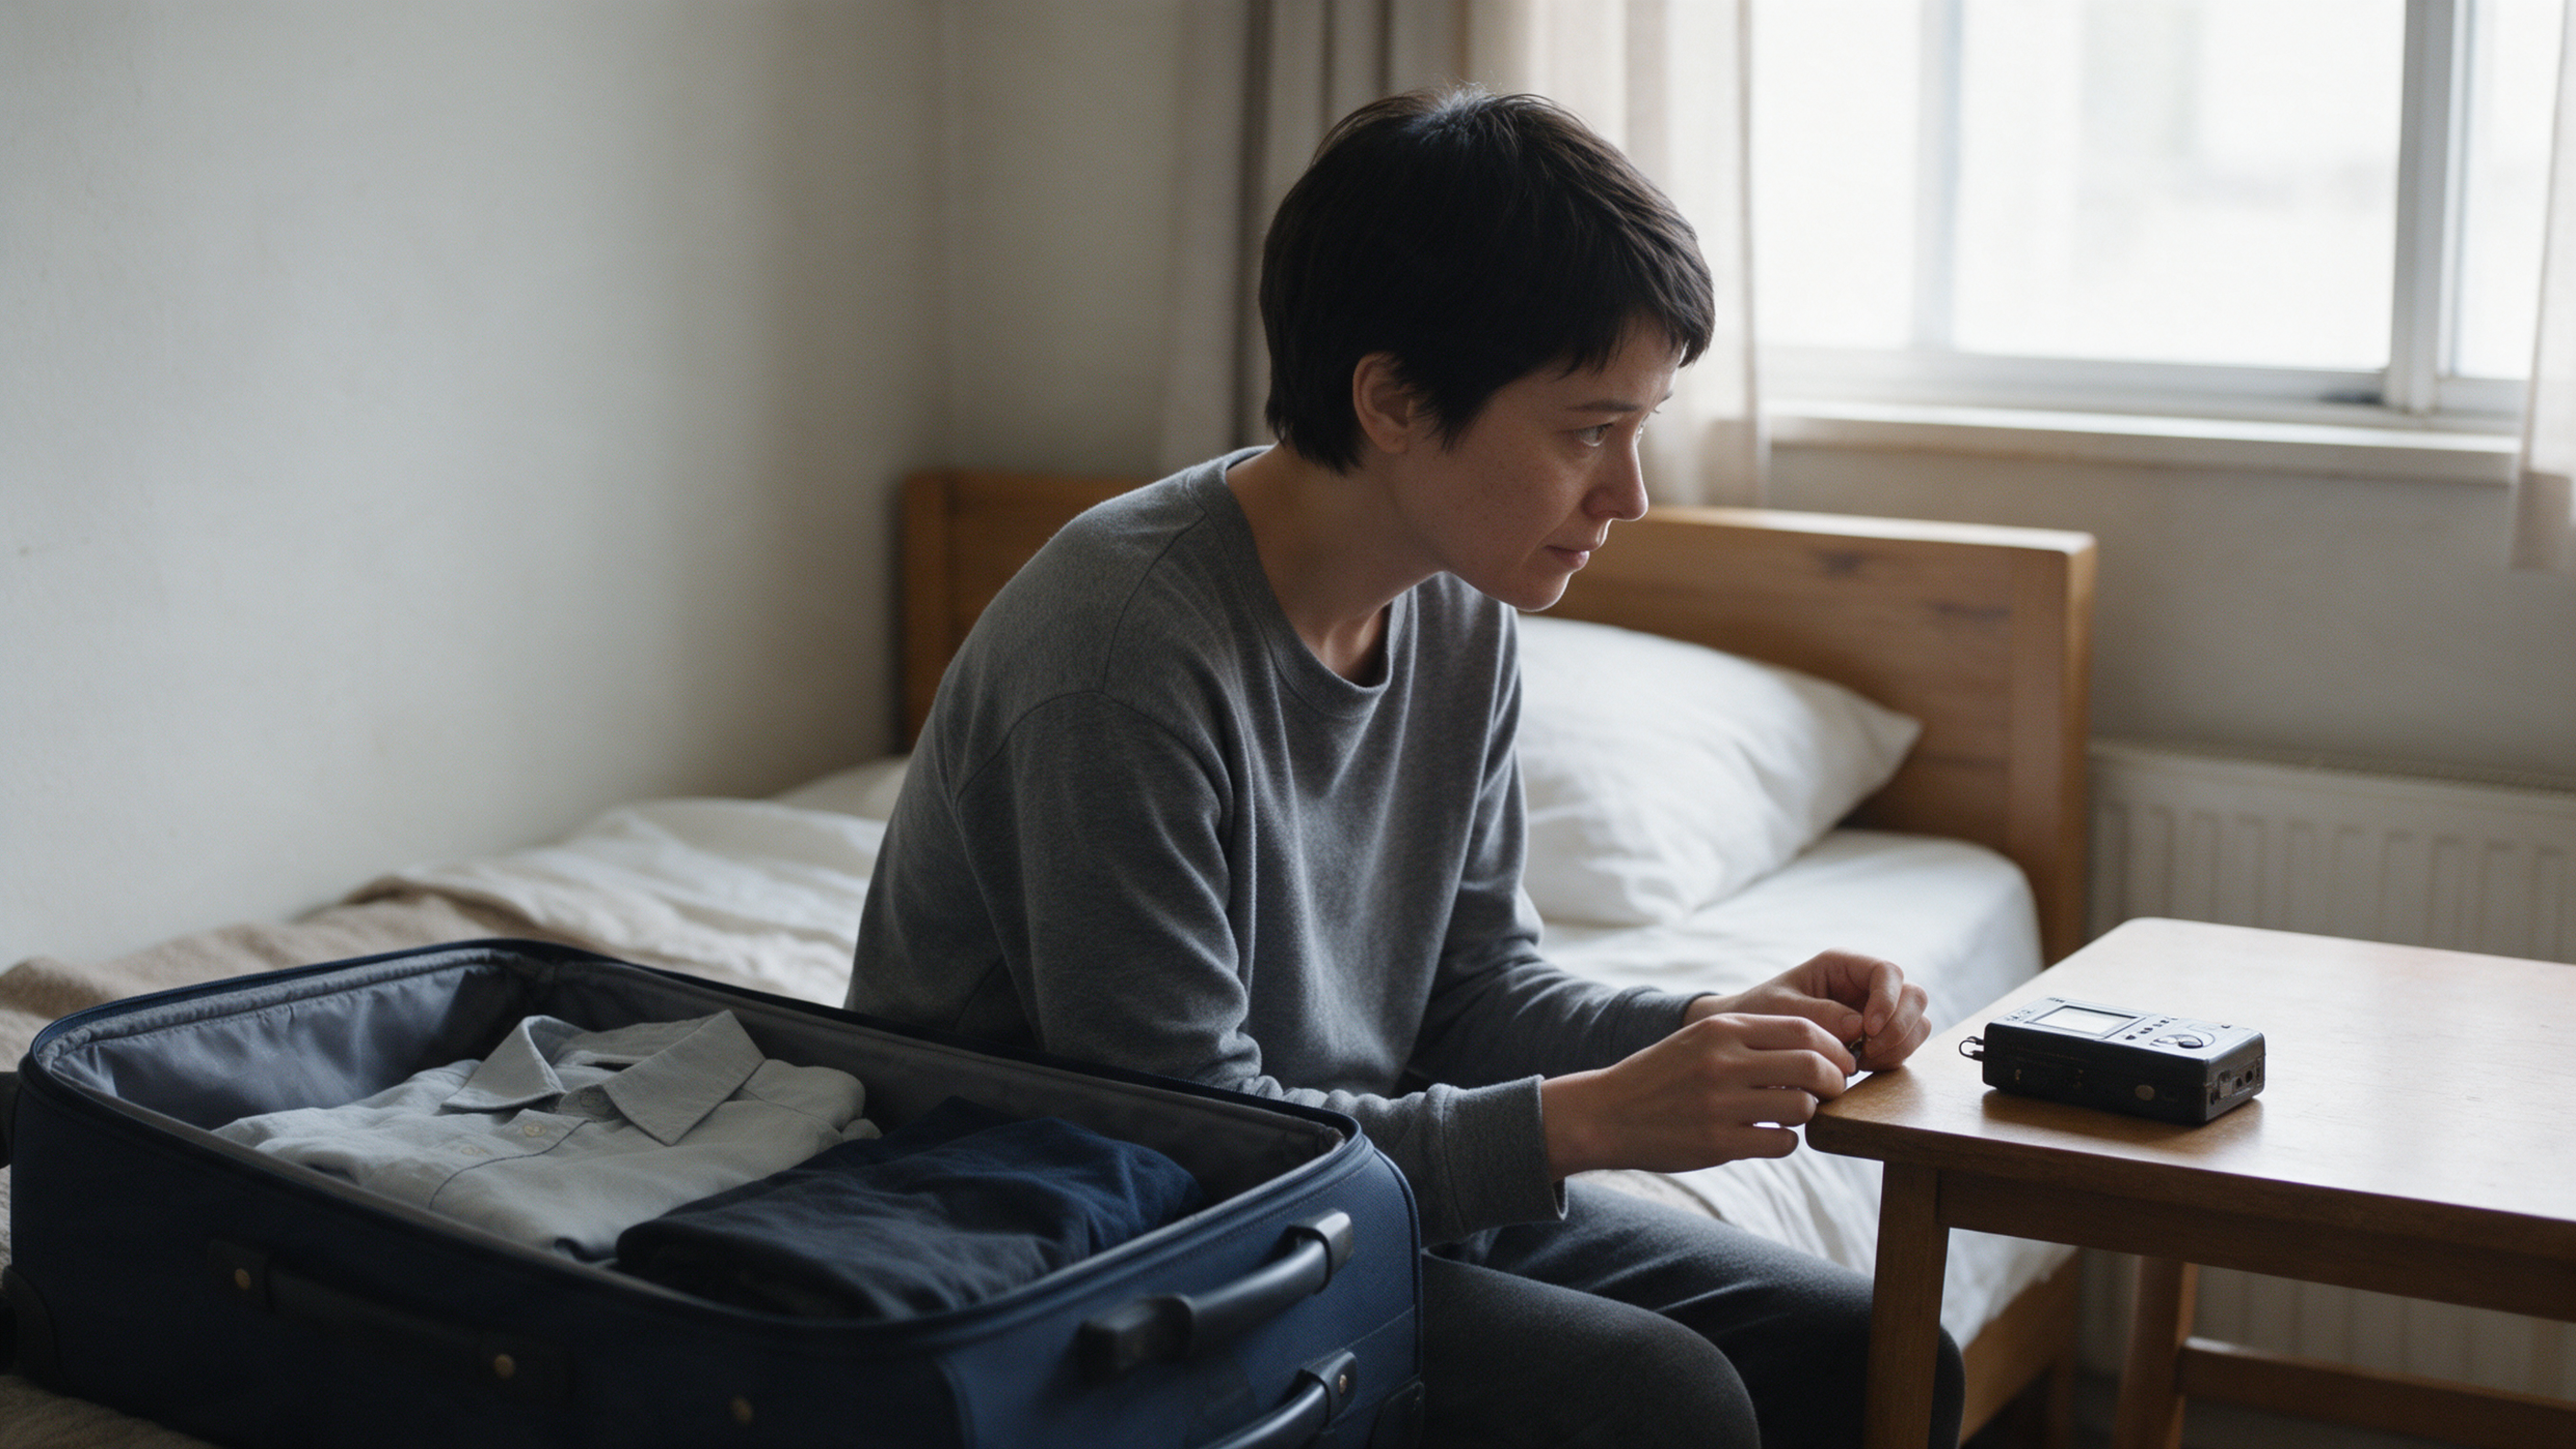
Using that image as reference, Seedance 2.0 Mini generated a 1280×720, approximately 5-second silent short shot. The short’s first frame continues the bedroom, gray-clothed character, suitcase, and table device; whether the character’s gaze is actually toward the device must be checked frame by frame and cannot be judged solely by the first frame. To include this shot in the complete short drama you still need to add preceding and following shots, the father’s recording, sound transitions, timeline editing, and a final export review.
The image below is a screenshot of the real canvas used in this case and can be used to verify the shot description, establishing still, short clip, and node connections.