When producing an AI series, how can you ensure continuity between shots so scenes don’t have continuity errors?
When producing an AI series, how can you ensure continuity between shots so scenes don’t have continuity errors?
I conducted a "Kitchen Red Cup" continuity-anchor test in 纳逗Pro: one 2K scene reference image followed by a short silent shot of about 5 seconds. The pre-submission estimates were 3 and 7 credits respectively, totaling an expected 10 credits. When making an AI series, the easiest continuity issue to miss is at the cut: an item that was still in the previous shot suddenly vanishes in the next. To reduce such errors, characters, sets, and props need unified specifications, and the start and end states of each shot must be recorded. After generation you still need to play the shots together; prompts and the last frame of the previous shot cannot substitute for this step.
Before reworking, first identify where the error occurred. If the character or set was drawn incorrectly, you must fix the references or remake the assets; if two videos each look fine individually but appear to be in different rooms when played together, then check the storyboard and cut points. Clarifying this prevents repeated generation cycles that never address the real problem.
Determine which layer the continuity error occurs in
Observed issue | What to check | Priority fix |
|---|---|---|
The character is wearing a coat in the previous shot, but the coat is gone in the next | Are the same styling references being used, and does the story explain a costume change? | Correct the styling references and the shot description |
Doors, windows, or a table have moved | Does the new camera position match the original scene layout? | Redraw the corresponding storyboard first, then regenerate the video |
The cup suddenly switches from the right hand to the left | Compare the start and end actions and the object-holding states across the two shots | Adjust the action design or the cut point |
Two people are talking but both appear to be looking the same direction | Check gaze directions and character positions | Adjust the composition to clarify spatial relationships |
One shot looks cool while another looks warm within the same scene | Are the light source settings consistent, or is it just a color cast? | Minor color shifts can be fixed in post; if lighting directions conflict significantly, redo the shot |
Before shooting, keep a continuity record for each scene
Even with character reference images, you must record what the character goes through in this scene. Whether a coat is off, clothes are wet, or a phone is in which pocket—these details do not automatically persist just because you used the same character image.
You can record four groups of information for each scene:
-
Character state: styling, accessories, wounds or stains, and any changes that occur in this scene.
-
Spatial relationships: doors, windows, tables and chairs, main light sources, and character positions. Draw a simple plan view if necessary.
-
Prop states: who is holding what, which hand it’s held in, and whether objects are open or damaged.
-
Action progress: where the previous shot ended and where the next shot should continue from.
Below is a fictional continuity example:
Shot | Start state | End state | Information the next shot must inherit |
|---|---|---|---|
A: Character enters | Holding a cup in the right hand, door closed | Door opens, character stops inside the doorway | Cup remains in the right hand, door stays open |
B: Character close-up | Standing inside the doorway, looking toward the table | Raises right hand to gesture | Gaze toward the table; the cup must not disappear |
C: Reaction at the table | Sitting at the table looking at the doorway | Stands up | Eye contact and seat orientation must be clear |
This record should be updated as the story changes. If the same character changes clothes in the next scene, that is a plot change; if the character inexplicably changes clothes within the same action, that is a continuity error that needs correction.
Keep original references when generating; don’t rely only on the previous shot
Keep the original character, set, and prop assets available so new shots can be compared back to them at any time. The previous shot can supplement the character’s current state, but first make sure that shot was rendered correctly. If the cuff and the cup are already wrong, reusing that frame can propagate the deviation from shot to shot.
The last frame is especially useful to understand the starting point of a continuous action. If the next shot switches to an over-the-shoulder or a substantially different camera position, redesign the composition based on the original scene rather than mechanically using the last frame as the starting image for all subsequent shots.
In 纳逗Pro, you can use video multi-reference mode to provide subject and other reference images; the start/end frame mode uses start and end images to generate intermediate transitions. Check the specific input capabilities against the chosen model; see the media generation guide. These features provide control conditions, but the results still require manual continuity checks.
Treat simple cuts and continuous transitions differently
If a character finishes speaking and you cut to another person’s reaction, finding the right cut point is often sufficient. This does not require an extra transition animation, and adding movement or morphing could break the dialogue rhythm.
If you do need to show the continuous process of walking from the doorway to the table, then check the path, motion direction, and environmental changes. First confirm that the start and end frames are in the same space, then attempt to generate a transition; adding a transition does not solve contradictory set dressing between the two endpoints.
For contact actions like picking up or handing over a cup, you can preserve key results and omit complex processes that don’t affect comprehension. For example, structure shots as “close-up of the object before picking up — character reaction — medium shot after picking up,” while ensuring the audience can still understand what happened.
After editing, review in three ways
First, watch once muted. Focus on character positions, gaze, entrance/exit directions, and action continuity. Spatial jumps that cannot be explained by dialogue should be fixed visually.
Then compare the boundary frames of adjacent shots. Pay attention to objects in hands, clothing details, and background layout. A shot can be internally consistent but still change suddenly at the cut.
Finally, play the sequence with sound. Check whether dialogue is cut off, whether ambient sound changes abruptly, and whether reactions match the lines. Continuity in the same scene also includes audio.
The rework method depends on the problem: remove unnecessary pauses by trimming, fix minor color casts in post, remake assets for facial or prop errors, and change the storyboard for spatial logic problems. Color grading cannot restore a shifted door or a cup that switched hands.
Save the styling and set versions used in this episode by scene when wrapping up. For the next episode, first check whether the plot changes clothing, location, or prop states, then decide which version to reuse. This way you can find the character’s precise state in the story without guessing from textual descriptions each time.
Real canvas case: check continuity anchors first; don’t pretend a single-shot acceptance equals cross-shot approval
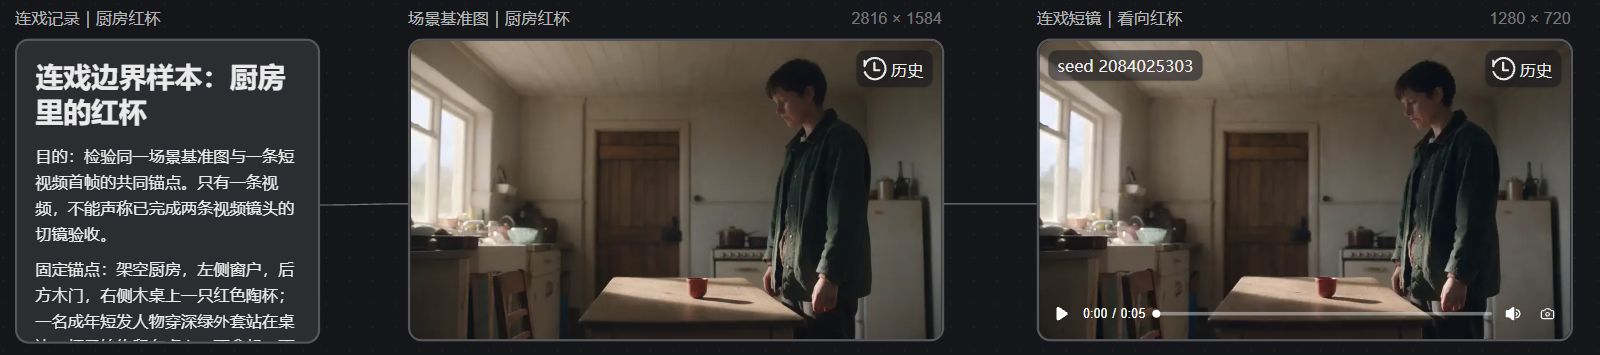
I recorded four anchors in the 纳逗Pro case canvas: the left-side window, the rear door, a red cup on the right wooden table, and the character’s dark green coat. The canvas links the info cards, the scene reference image, and the short shot in sequence. The character and the kitchen are fictional constructs. There is only one video here, so you can check element continuity from the reference image to the first frame of the short shot, but this cannot prove that two separate videos have been successfully stitched together.
The scene reference image generated by Seedream 5.0 Pro is actually 2816×1584. The left side of the frame has a window, a wooden door at the rear, and the character in a dark green coat standing by the table with a red cup on the wooden table. It provides position and styling anchors for subsequent verification.
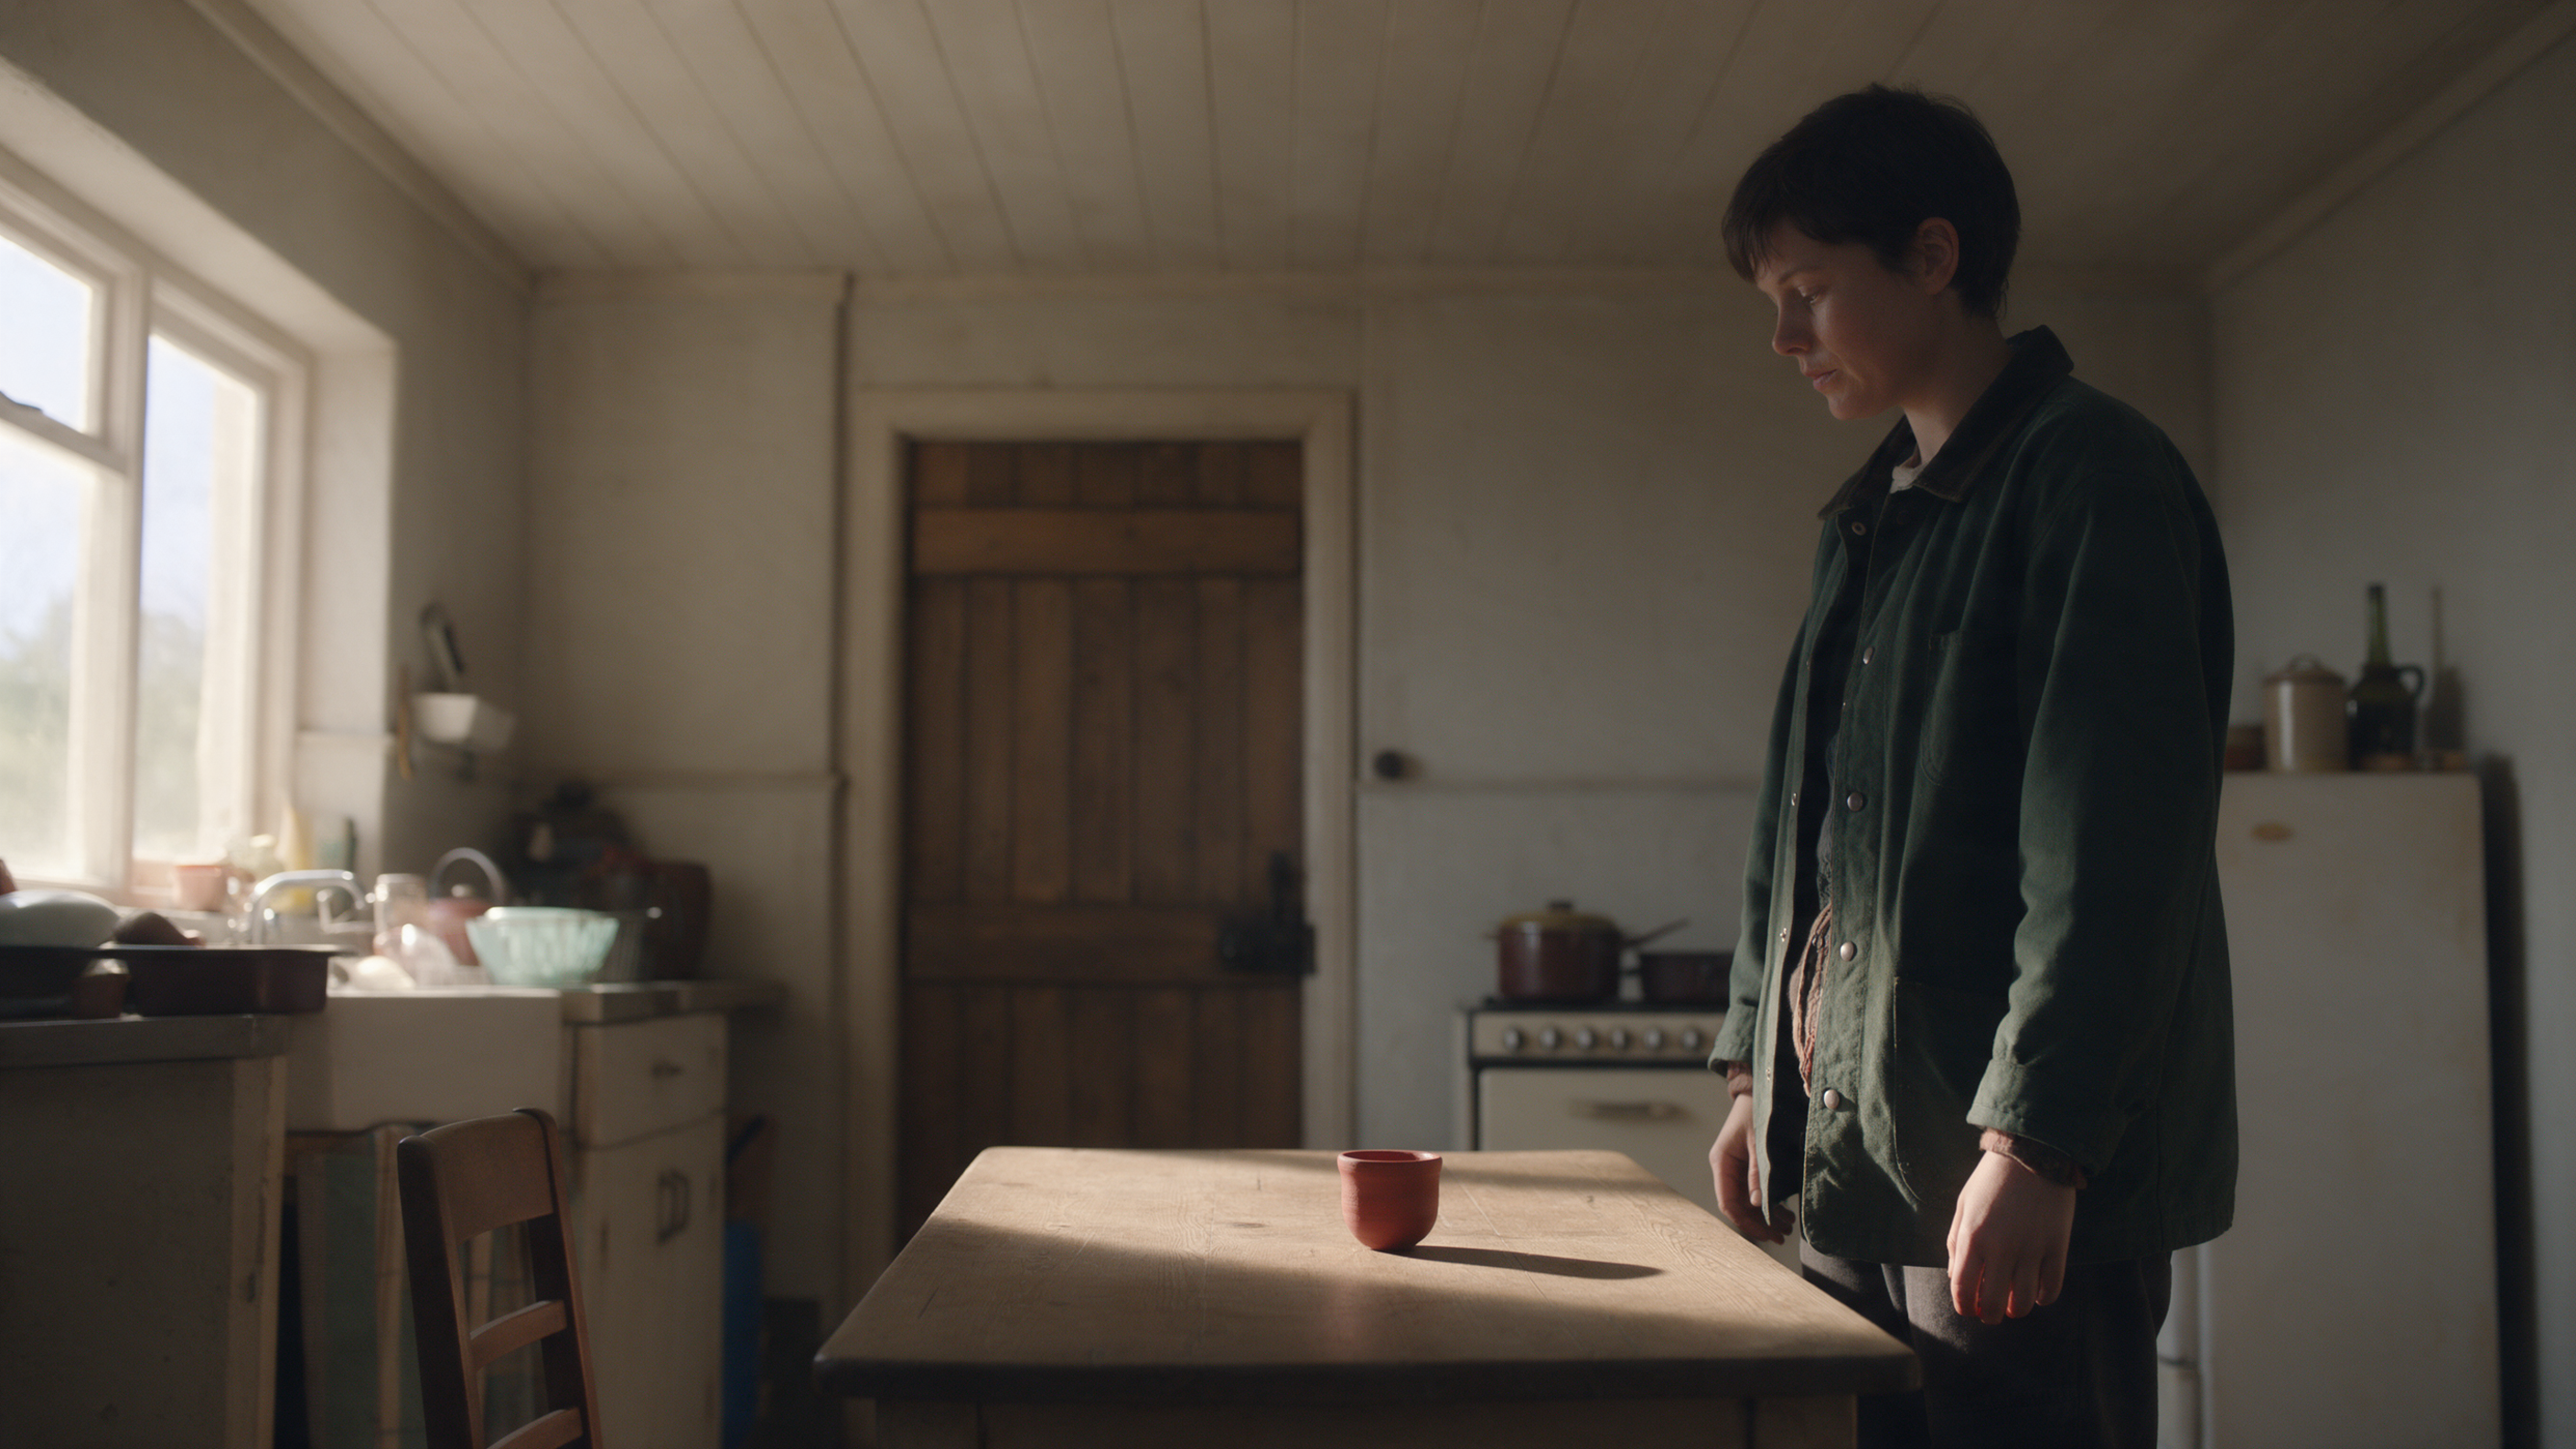
Using that image as a visual reference, Seedance 2.0 Mini generated a 1280×720, ~5-second silent single-shot clip. The first frame of the short shot still shows the left window, rear door, character in a dark green coat, and the red cup on the wooden table; the spatial relationships are close to the reference image. For formal continuity you should produce adjacent shots A and B on the same timeline and compare A’s last frame, B’s first frame, motion directions, cup state, and audio; a single-shot sample does not cover that acceptance.
The image below is a screenshot of the actual canvas webpage for this case, which can be used to verify the continuity notes, the scene reference image, the short shot, and their dependency connections.